
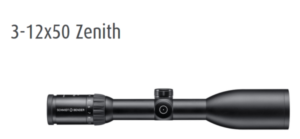
Schmidt and Bender Zenith 3-12×50 Review and Price
The Schmidt & Bender Zenith hunting scopes are made, designed, and equipped to meet and handle all the challenges of high precision shooting.
These top-quality and functional scopes are known for their exceptional ability in achieving and fulfilling demanding shooting needs in tactical applications and law enforcement among other uses like hunting
. Make sure to follow operational instructions and maintenance guidance to enjoy many years of service of the scope.
Schmidt and Bender zenith 3-12×50 review
Schmidt and Bender zenith 3-12×50 is known for its large magnification and effectiveness and accuracy in long-distance shooting or even small target shooting. The scope features enhanced luminous sensitivity making it very effective at dusk. It has a harmonic form giving it a very defined and sleek appearance. Features
Technical Information
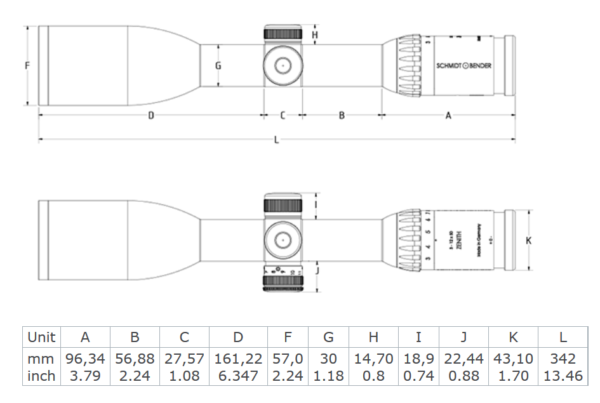
Dimensions
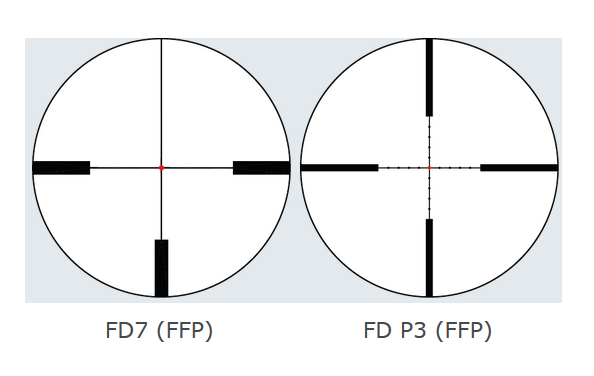
Reticles
Schmidt Bender Zenith 3-12×50 A7 Rifle Scope Price Schmidt Bender Zenith 3-12×50 FD7 Rifle Scope Price Schmidt Bender Zenith 3-12×50 A9 Rifle Scope Titanium Price Schmidt & Bender Zenith 3-12x50mm 7-Reticle .1mrad CW Riflescope Price Schmidt Bender Zenith 3-12×50 FD7 Rifle Scope with BDC H Price Schmidt Bender Zenith 3-12×50 A8 Rail Scope 974-011-802 Price |
Schmidt and Bender Zenith 3-12×50 Safety instructions
- To prevent injuries to your eyes never look into the sun or laser light using the scope
- Never tamper with the scope
- Repairs should only be done by specialists authorized by Schmidt
- Make sure to protect the scope from shocks beyond the normal use shocks
- Avoid unnecessary long exposure to direct sunlight, excess and intense solar radiation will increase the tube temperature to extreme levels which can have detrimental effects on the scope
- Proper mounting of the scope is paramount and must be done by a qualified specialist. Perfect mounting means enhanced accuracy, functionality, and precision.
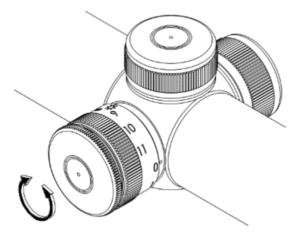
Adjusting the Image Focus with the Diopter Adjustment of the Eyepiece
Adjustment of the reticle focus to the individual eye diopter is a provision of the eyepiece. To adjust set the scope to the highest magnification. Counterclockwise rotate the eyepiece until it stops, then rotate eyepiece clockwise until you see a sharp image of the reticle.
Schmidt and Bender Zenith 3-12×50 Illumination Control
This scope comes equipped with the Flash Dot technology which provides a projected bright red dot along with a reticle in the second focal plane. The red dot is in the center of the reticle and will disappear completely when the scope is switched off. For the maximum or optimal acquisition of the target, make sure the intensity of the illuminated dot is set to the respective conditions. To achieve this, turn the illumination control from -0- toward position -11- until you achieve a setting where the red dot is just bright enough to be picked up by the eye without glaring. It’s recommended that this adjustment is done under quiet conditions prior to the actual shooting.
If after use you don’t switch off the illumination, the illumination control electronics will automatically switch off the illumination after 6 hours. If the illumination blinks, the battery is low and needs replacement.
Changing the Battery

- To change the battery start by screwing off the battery cap and removing the old battery.
- The removed battery should be discarded in an environmentally friendly manner
- Place the new battery (coin cell CR 2032/3V) with the „+” facing up into the
battery compartment - Battery change should only be done in a dry environment
- Do only change the battery in a dry environment.
Using the Reticle for Distance Estimation
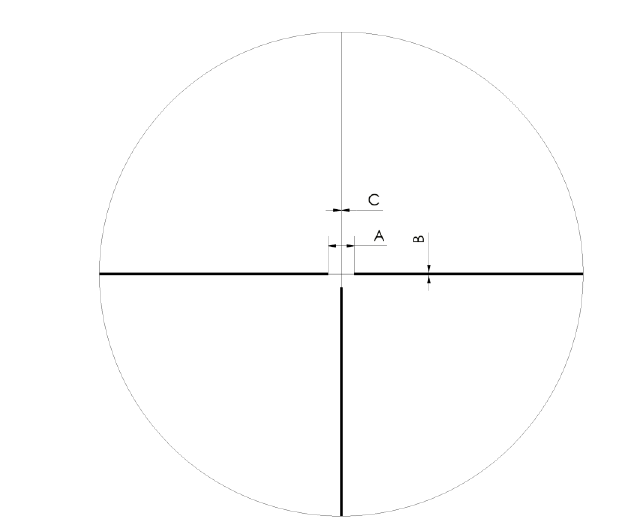
This scope’s reticles offer a variety of possibilities to estimate and measure different parameters using reticle subtensions. These subtensions allow for high precision shots even on long distances using the estimates and the ballistic compensator.
The reticle is in the first focal plane meaning the reticle subtensions remain constant on all magnifications.
Exemplary for one reticle in the first focal plane, the distance “A” of the large tics corresponds to 140cm/100m. The shooter can thus calculate the distance to a target which size is known by measuring it with the reticle pattern: If a 140 cm sized target fits in between the distance “A”, it is positioned in a distance of 100 m.
For arbitrary object sizes and distances, a relation exists according to the
following formula:𝑑 =𝑔/𝑎 ∗ 100 𝑚
Where
𝑑 -distance to the target,
𝑔 – the estimated target size
𝑎 -the size of the target on the reticle pattern
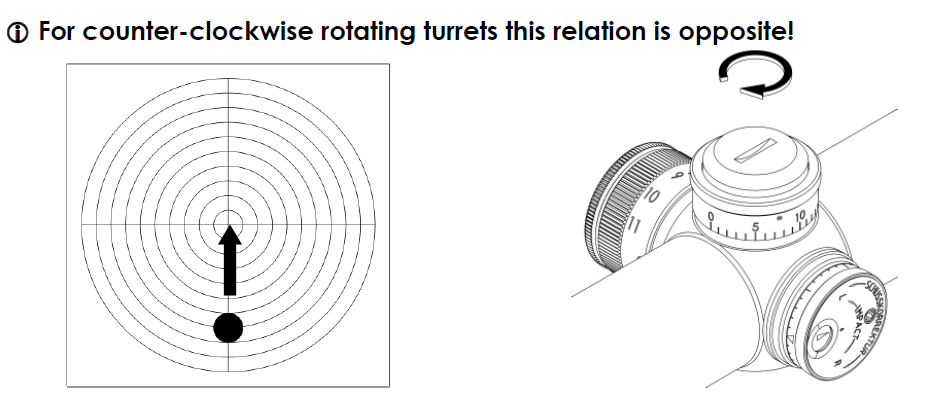
Using the Posicon Turrets
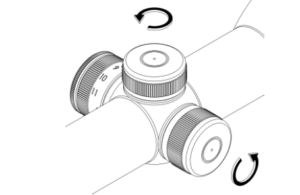
To use the turrets, remove the caps from the windage and elevation turret by counter-clockwise unscrewing. When you get your scope, the black arrow is in the white screen of the turret indicator pointing to the center, which is symbolized by an – o -. This position ensures that in both left-to-right and up-to-down directions there is a maximum amount of adjustment range.
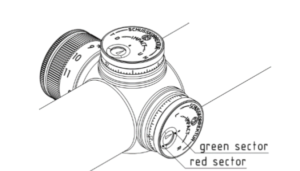
The arrow of the “Posicon-Clock” provides information on the position of the reticle at any time. The green sector is used to indicate the square adjustment range where windage and elevation adjustment do not interfere with each other. The red sector indicates the buffer, which provides an additional amount of adjustment in either direction, but in which one adjustment direction might interfere with the other.
When you need to sight in the scope for the first time, or re-sighting a test shoot for zeroing should be done at 100m.
Schmidt and Bender Zenith 3-12×50 Elevation adjustment
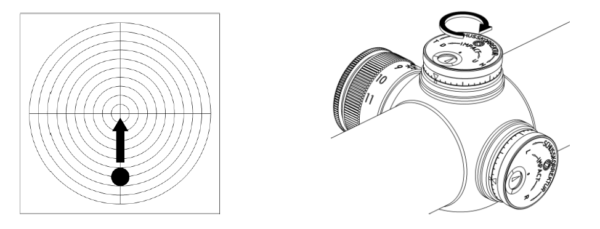
During elevation point of impact is moved by 1cm on 100 m on every click. When the point of impact is too low it corrected by rotating the elevation turret clockwise into the direction indicated by “H” or “U”. If the point of impact is too high, it’s corrected by rotating the elevation turret counter-clockwise into the direction indicated by “T” or “D”
Schmidt and Bender Zenith 3-12×50 Windage adjustment
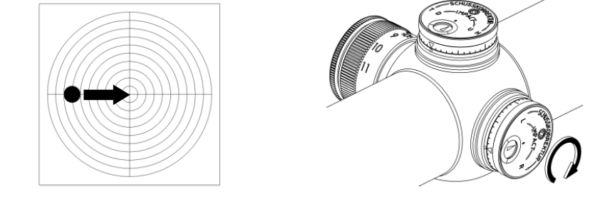
For windage adjustment, the point of impact is moved by 1cm on 100m on every click. If its too far left
point of impact, correction is done by rotating the elevation turret clockwise into the
direction indicated by “R”, while if its too high, it’s adjusted by rotating the elevation turret counter-clockwise into the direction indicated by “L”
Marking the zero position
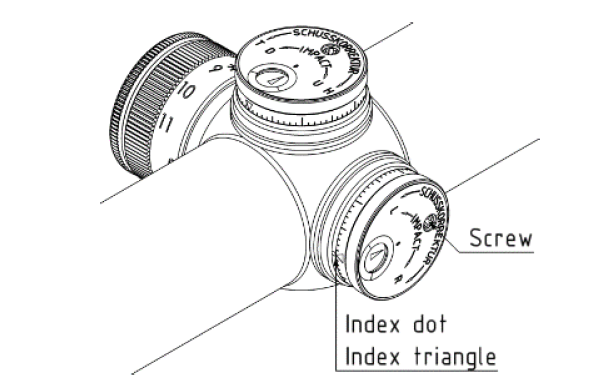
All the obtained reticle positions can be marked by the aluminum ring below the knurl. To mark the zero position, unscrew the cross-slot screw in the Posicon screen and position and turn the aluminum ring until the index dot and the index triangle match. Then screw the cross-slot screw tightly
Elevation adjustment Bullet Drop Compensation (BDC)
Depending on the configuration, the point of impact is moved by 1cm on 100m or ¼ MOA on every click. Correction for a low point of impact is corrected by rotating the elevation turret clockwise while a high point of impact is corrected by rotating the elevation turret counter-clockwise.
Schmidt and Bender Zenith 3-12×50 Care and Maintenance
- Schmidt & Bender Zenith do not need any special maintenance and they will last a lifetime
- All metal parts have a hard-anodized surface which is scratch-resistant and easy to care for if you need to clean them use a clean and slightly damp cloth.
- Use a dry brush to remove coarse dirt or dust particles before wiping the optic’s surfaces
- For small impurities use a microfibre cloth to wipe them off
- You can breathe on the optic’s surfaces before cleaning them to ease the cleaning process
- If there is excess dirt use lukewarm water.
- Avoid dry rubbing the outside optical surfaces to prevent harm to the coatings
- The approved storage temperature is from -55°C to 70°C.
Verdict
Schmidt & Bender Zenith scopes are not only high-end but also very effective in high precision shooting even at long distances. The scopes will bring forth exceptional abilities and performance even in the most demanding conditions.

Albert, the founder of Outdoormoran, is a dedicated outdoor enthusiast with a passion for delivering the most current, accurate, and easy-to-understand information on all different outdoor gear and optics. He shares his expertise with beginners by teaching the technical aspects of outdoor gear and optics through his comprehensive collection of guides.